Saturday, 12 March 2011

Wargames Weekend: Breakthrough - Connaught 1599

Time for yet another wargames weekend with Lenin. We have a couple of new rule sets to test out this time so we started off with Tudor Ireland using the To the Banners rules by Stephen Danes. It was also a chance to get my Vendel and Graven Images figures to the table again along with the Warbases movement trays which I picked up to do just this sort of larger game.

The scenario was taken from the rules and involved the English troops advancing up a valley through some woods in an attempt to break through to relieve another English force. The Irish had laid an ambush having blocked the road at the most difficult point for the English to pass.

Things started fairly slowly with the English pike advancing in column up the road flanked on both sides with units of shot. The Irish faced them with four units of Kern with their Gallowglas held in reserve further up the valley.
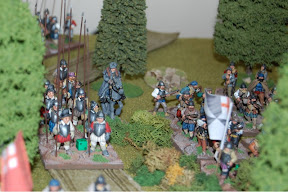

The English advanced slowly toward the Irish barricade and opened fire on the Irish troops. Eventually the English pike summoned up the courage to charge the Irish who stood their ground. It was not an even match and the pike pushed the kern back again and again until having taken as much punishment as they could they turned and fled. The English pike pushed on into the next unit of Kern with similar results whilst the Gallowglas looked on unable to respond.


With the English pike advancing but their shot stalled at the edge of the wood the pike now came into contact with the lead Gallowglas unit which was a more even match. The charged and the Gallowglas, probably seeking revenge for the Kern, counter charged. A bitter struggle ensued with the units evenly matched. Then suddenly the tables turned and the Gallowglas managed to get the upper hand pushing the pike back until eventually they routed.

With the English pike streaming back through their ranks the English troops were disordered and back to fall back. With the English attack faltering the Irish took to their heels to set up another ambush further along the path of their advance.

After the game we spent a little while reviewing the rules. We liked the innovative approach to the initiative mechanic which provided some real command and control issues for both sides. Although the rules had some significant omissions which did call into question how thoroughly they had been playtested and could have been laid out in a more accessible manner. We plan to give them another go with a more conventional set of forces to see how they perform.

Monday, 21 February 2011

Project Update

With the year rushing by I thought it would be a good opportunity to pause and consider progress with my various projects.

28mm Sudan
This is progressing nicely and I am really liking the Perry figures. I am planning to keep expanding the collection slowly with my next purchases at Salute. I am thinking Yorks & Lancs and Hussars as the next phase but I'm not sure which way to go after that. The Perry's have such a wide range it is difficult to stay focussed. Mahdist cavalry are a real possibility but I would like to get some Naval Brigade or some Bashi Bazouks...

28mm Indian Mutiny
My first batch should be back from the painter shortly which will give me some more basng to do (I need to work out which foliage to pop on these!). Next I would like to add some more of the lovely Mutineer figures. Cavalry a real possibility but I would also like some Sikhs though. Then I really need to find some suitable walls for a larger siege.

28mm North Africa/Med
With the Afrika Korps and Goumiers hitting the table shortly, I have managed to pick up some more Artizan US infantry figures nicely priced on eBay. I plan to use these as US equipped French but I can also use them for more mainstream American troops both for the Med and for North West Europe (including The Big Hurt)

15mm Marlburian
After a lot of thinking I have finally plumped on some figures which I will be picking up at the Tonbridge show. These are, however, only a start and this projec is likely to run for a while. The next main decision is which rules to use, I have a few candidates but need to try them out before deciding.

28mm Montrose
After having had these figures around for quite a while but couldn't decide on which rules to use and then got distracted. I have a couple of candidates to try out and I've found some nice flags which I hope will finish the figures off. I was a little concerned about storage, especially with the pikes. With my Tudor Ireland having grown out of my Border Reiver skirmish project the figures were all individually based, making storing straightforward. The Warbases movement trays enable me to have the best of both worlds and I plan to use the same approach for the Montrose figures.

28mm Moderns
I was extremely fortunate to pick up some Mongrel Soviets and Afghans on eBay recently (handy as I understand Newline may be having problems with supply). These will allow me to do the Soviet invasion of Afghanistan but also allows me to use some of the Russians against my BAOR figures for what if WW3 scenarios in Europe.

Obviously with all these progressing I have decided to put a hold on my other ideas for the moment.

Wargames Weekend Planning

With another visit from Lenin coming up in a couple of weeks I have been trying to put together a few games. I've got three planned which are a mix between getting new toys to the table and trying out new sets of rules. In both cases I am using the term "new" in a fairly lose way as in couple of cases I have had them a while but haven't used them! Currently on the agenda are:

28mm Sudan - a chance to try out my Perry Highlanders, Egyptians and Mahdists

28mm WW2 North Africa - new figures again, this time the Artizan Afrika Korps and Goumiers but also trying out "vanilla" Nuts! 2.0

28mm Tudor Ireland - whilst some of these figures have had an outing before, this is a bigger scenario and so will get most of my collection tabled. It's also a chance to try out the To the Banners rules and use my Warbases movement trays I have just finshed.

15mm French & Indian Wars - this is really a chance to give the Warlord Black Powder rules a go to see whether they are something we want to add to our regular rulesets. They're so nicely produced I really hope we're going to like them!

Saturday, 12 February 2011

More Mahdist War

I thought I would post a few pictures of the figures I have just finished for my Mahdist War project. First the British officers:


Then the highlanders:


And finally the opposition:


They are all 28mm figures from the Perrys.

Sunday, 23 January 2011

Stalingrad: Heroes All

The latest supplement for Nuts! Second Edition has just been released by Two Hour Wargames. Based around Stalingrad (obviously!) it provides 22 linked scenarios intended to be played from the German side. The scenarios are broken down into three main phases of the action around Stalingrad, Fall Blau, Rattenkrieg and Operation Uranus.

The supplement comes in at 50 pages overall and is, as usual, available in both PDF and printed formats. The first few pages are taken up with an introduction, background, some historical characters you can introduce and a couple of new character attributes. The necessary tables for the units involved and those for reinforcements and vehicle lists follow. This all takes up the first dozen or so pages and the balance is taken up with the scenarios themselves and their maps.

The various scenarios are of differing sizes from small to medium sized actions and the three phase split provides some quite differing settings including the mandatory factory fighting!

The supplement is intended to be used with the second edition of Nuts! and the previous Eastern Front supplement Clash of Titans; however, it would probably not take much to adapt them to other sets of rules or fill in the blanks.

Thursday, 6 January 2011

Mahdist War Project Update

Next up in my basing schedule were some additions to my Egyptian army for the Mahdist War:


North Africa Project Update

I finally finished basing the first figures for my North Africa / Mediterranean project. The figures are all 28mm from Artizan Designs but, as you can see I have decided to take a slightly different approach and focus on the French.

First up the opposition - a selection from my Afrika Korps:


And now some Goumiers:


These chaps had a pretty fearsome reputation but ended up with quite a mix of equipment (some of it obtained through slightly dubious means!)

I plan to get these to the table soon and follow up with some more traditional infantry. I will be using Artizan US figures to represent the American equipped French (which will also allow me to use them in their more traditional role too).

Saturday, 1 January 2011

Happy New Year

Just a quick note to wish all of you the very best for a happy and prosperous 2011.

I have yet to make my New Year's gaming resolutions but I suspect some of them may well be influenced by my increasng storage space problems.

In any case 2011 should certainly see more Sudan, my new Dahomey, Indian Mutiny and WW2 North Africa projects hitting the table and, hopefully, me actually making a start on figures for my 15mm Marlburian outing. I am going to try to avoid starting too many new projects (although that's never worked in the past!) since I still have unpainted metal for WW1 Eastern Front, RCW, modern Afghanistan, WW2 Paras and Maximillian in Mexico to progress.

Tuesday, 28 December 2010

Christmas Haul

I was fortunate enough to get a few gaming related books this Christmas starting with the Black Powder rules from Warlord.


The rules cover the horse and musket period but have been extended a little to include colonials. The rules are certainly beautifully presented with acres of eye candy. They are based on a core set of mechanics which apply to all the periods with additional special rules for individual periods. The mechanics themselves are fairly traditional but appear to be for those gamers who have large collections of figures and want to get them out and use them without having to learn a completely different set of rules for each period.

The authors have used an entertaining style and have made it clear that they have written the rules for large quantities of 28mm figures on large tables but have provided enough information to enable the rules to be used with smaller scales and tables.

I have played in a couple of games using the rules but I am looking forward to playing one now I actually have the rules themselves!


Next up was a copy of Infantry Attacks written by Erwin Rommel himself.

Originally published in 1937 the book covers his experiences in the first world war (which were extensive) and should provide a real insight to the legendary military leader.

I am really looking forward to reading this one!


And finally I got a copy of The Great Mutiny: India 1857 by Christopher Hibbert which is ideal for my new period.

Now off to do some more basing...

Saturday, 25 December 2010

Happy Christmas

Here's wishing you all a very merry (although you may regret too merry) Christmas and hoping that Santa brought you something fun!

Thank you for taking the time to read my various ramblings and particularly to those of you who were kind enough to provide some useful feedback.

I have been lucky enough to get some useful gaming inspiration so far and, due to our particular approach to the day still have a couple more things to come so fingers crossed for some gaming goodness...

Saturday, 4 December 2010

Wargames Weekend: The Photos

First Look: The Big Hurt


With Two Hour Wargames offering a discount on their second edition Nuts! Rules I thought I would pick up a copy (we've been using a mix of the original, CR3.0 and our own interpretations). Whilst I was looking I spotted another scenario book - The Big Hurt - and thought it was worth a look.

The Big Hurt (TBH) is a scenario book for Nuts! Second edition by Darby Eckles that covers the Battle of the Hurtgen Forest from September 1944 to February 1945. The secenarios are intended to be played from the US side with the system runnng the German forces and they link together to make a campaign. You are intended to develop a single detailed infantry squad which may be reinforced in any individual scenario and follow the squad through their various encounters.

TBH is 47 pages long and contains 21 scenarios along with some background, a few additional rules and all the necessary stats and tables. There are some sections from the main rules reproduced for ease, for example those on the Non-Player forces mechanics but access to the main ruleset is a necessity.

The scenarios are designed to be played on a 5' x 3' table and each scenario map is appropriately covered by a 6" grid to make layout easy. Each scenario covers approximately 1 page (in the usual THW two column format) and is split into Situation, Objective, Forces, Terrain, Deployment and Special Instructions sections.

The whole thing looks pretty well put together and I am looking foward to playong through it once I have the appropriate toys procured!

Friday, 3 December 2010

Wargames Weekend: Operation Cauldron - Part 2

With the landing a success the Commandos moved on to their main objective. With their approach covered by two MG34s the attack needed some careful co-ordination but they managed it and the MGs were soon silenced but the alarm had been raised.


Swift action by the Commandos saw them storm the wire and take the German MG positions and engage both the other German infantry position to their flank and their approaching reinforcements.


The next rush into the German infantry produced mixed results with the Germans initially fighting back with serious results but eventually being overwhelmed.

The German reinforcements tooks cover behind the hedgerow but then became trapped between two groups of Commandos and were slowly eliminated.

The German flak tower then came under fire and before it could return fire with devastating effect they took enough casualties to ensure the kept their heads down.

With the Commandos moving towards the artillery positions more German renforcements appeared; however, these weren't the garrison troops they had previously been facing but some more experienced troops.


These reinforcements took up a position between the Commandos and their objective and laid down some punishing fire. This meant each side truing to outflank each other. Initially the Germans had some success but a brave rush combined with an effective grenade throw devistated one of their positions and thngs started to come unravelled for them.

The Commandos began to mop up the last resistance and, with the artillery crews running for their lives, finally reachd their objective and disabled the guns with their satchel charges.

Wednesday, 1 December 2010

Wargames Weekend: Operation Cauldron - Part 1

At our last gaming weekend we had discussed the fact that we didn't often play "big" or linked games very much and our attempts at putting together anything approaching a campaign had been a bit of a failure. So to remedy this I decided to put together two linked WW2 games based around the August 1942 Dieppe operation. In this case I went for the attack on Hess Battery to the flank of the main assault - mainly because I wanted to use my Foundry Commandos and a few other bits I have picked up over the year. Obviously we couldn't model the entire Commando raid at 28mm on my 6x4 table so I scaled things down a little.

Objective
Assault the Hess Battery, prevent it from engaging the main landings at Dieppe and successfully withdraw with minimal casualties.

The Plan
Orange Beach is to the right flank of the main assault on Dieppe and comprises two separate landings by 4 Commando. C Troop with a section of A Troop under the Command of Major Mills-Roberts are to land on Orange Beach I near Vasterival and proceed to secure the headland and advance to provide covering fire for the main assault on the battery. B and F Troops with a section of A Troop under the Command of Lt. Col. Lord Lovat are to land at Orange Beach II, between St. Marguerite and Quiberville, disrupt enemy communications and advance up the Saane valley and assault the battery from the flank/rear.

Once the order is received all units are to withdraw to their embarkation points.

Forces
F Troop HQ
Two sections of F Troop

The initial landing was a bit of a mixed affair. The German sentries and MG teams didn't spot the landing craft until they were almost at the beach but once they did the LCAs came under some heavy fire. The land craft crews tried to keep the German's heads down with their lewis guns but this only silenced the rifle fire and the MG34s kept blazing away. The Commandos added their brens to the firefight and things went onto a slightly more even footing.

With the ramps down the Commandos started to rush ashore. This was when the encountered their first casualty. Leading one of the files of men onto thr beach the TSM was caught by a burst of German MG fire and was killed instantly. This slowed the disembarkation from one LCA but the other went a little more smoothly.


With the combined Bren and SMG fire from the Commandos keeping the German MGs quiet the assault on the wire began. Whilst a few of the Men got hung up on the wire enough got through to begin the climb to the heights to attack the MG position there. A quick rush with a grenade put paid to one of the German MG34s.


On the other side of the beach things had stalled with the death of the TSM but eventually got going again and with the wire crossed the last German resistance at the beach was dealt with.


With the prisoners secured the advance continued but the remainder of the German section was advancing on the beach from their billet so the Commandos took up covering positions and quickly dealt with them. They then advanced towards the buildings but as they approached they could hear vehicles approaching down the road.

The Commando teams split up to secure the buildings and to deal with the approaching threat. The team on the high ground spotted a German truck and motorcycle team coming down the road. A hail of automatic fire saw the the motorcycle combination crash into a wall and the truck almost do the same. The toss of a grenade from the other team put paid to the German reinforcements whilst the others secured the buildings.


With the beachhead secured the Commandos could move on to their main objective - the battery.

Sunday, 28 November 2010

Wargames Weekend: The Battle of Te-li-ssu

For our afternoon game we moved to Manchuria and down a scale to 15mm for a Russo-Japanese War game which was a trial run for the Bloody Picnic rules.

The Japanese 2nd Army under General Baron Oku had orders to capture the hamlet of Te-li-ssu, which lies to the north of the Fu-chou Ho river valley.

I took on the role of Lieutenant-General Baron Oshima, commander of the 3rd Division which was on the right of the Japanese advance. The 5th Division was to our left attacking the centre of the Russian positions, whilst the 4th Division is attempting to outflank the Russians on the far left.

On the previous day our artillery, supported by guns from the 1st Artillery Brigade, fought and won an artillery duel that forced the Russians to withdraw their guns from the forward slopes of the hills on the other side of the valley.


Our infantry also contacted the Russian infantry on our right flank, but though they initially fared well, the Russians bought up reinforcements, which halted our attack.

Under the cover of the early morning fog we planned to launch an attack at dawn to take the heights this time.

Initially things went well and our advance across the valley was uncontested, concealed as it was by the slowly lifting fog.


However, as we approached the steep slopes on the other side we came under fire from the entrenched Russians and were unable to use our artillery as visibility was still too poor.

One of my infantry commanders was a little over zealous and started to advance up the slope toward the enemy trenches but this smply resulted in an entire battalion being eliminated. So we spread out on the valley floor and began a a prolonged firefight with the enemy.


Eventally our superior numbers began to tell and the Russians' fire lessened. With their command and control in chaos their reinforcements failed to arrive and we managed to secure the heights.

Bloody Picnic are a pretty traditional ruleset based on General de Brigade. but neither of us were sure whether the scenario properly tested the rules and so another outing may well be in order.

Wargames Weekend: Carson Smith and the Tomb of the Prophet

Our first game of day two was an adaptation of a Pulp scenario for the Too Fat Lardies' Through the Mud & the Blood. Lenin made a few alterations to the original to reflect the figures he had available and so whilst I played to type taking the part of Doctor Zyklon and the forces of EFLUENT, the Evil Forces League for a United Empire of Nepotism and Terror; Lenin took the part of Carson Smith, the famous archeologist, and FLANGE the Forces of the League of Associated Nations for Government by Enlightenment. In this instance FLANGE was represented by Commander Tom Collins and the brave sailors from the USS Sangria. Their mission was to shadow Dr. Zyklonʼs expedition through the bush and establish just what it was he is seeking in Darkest Africa.

Of course as Dr. Zyklon, I knew exactly what I was seeking - an ancient stone of power revealed in the ancient scripts that I had recently ʻacquiredʼ from the Moscow Imperial Institute in the last days of 1917.

Only having vague guidance from the ancient scripts I first ventured into a nearby native village to see if I could extract any help from the locals.


Meanwhile Carson Smith tried to locate the tomb before us. As we surrounded the village Sturm-Leutnant Anatolya and his men spotted a group from the Sangria. One of the advantages of playing the baddies is the ability to shoot first and ask questions (using the appropriate tools) later. So it was first blood to EFLUENT.

Dr. Zyklon and Sturm-Major Werner von Blott quickly established the location of the tomb but with more sailors from the Sangria coming into view a more defensive strategy seemed prudent. Of course I ordered Sturm-Leiter Bulgarov and his men to secure our flank. Unfortunately he ran into yet more of the Sangria crew and another firefight ensued in the jungle.


Whilst we were dealing with the US sailors, Carson Smith was taking his native allies to locate the tomb.


Taking care of the opposition took a little while and that gave Dr. Smith the chance to excavate the tomb and decypher the inscriptions. Of course having dealt with most of the opposition I had one of my teams keep him under observation and once he had entered the tomb and retrieved the stone we moved in and surrounded him. Dr. Smith had little choice but to hand over the artifact but swore revenge!

Wargames Weekend: Follow that Camel!

Next up was another outing for Two Hour Wargames' Colonial Adventures - mainly so I could use my Redoubt French Foreign Legion and my new desert fort.

Legion Brief
There have been signs of a major uprising coming (and not as a result of the poor food). The local Tuareg leaders Sheikh Yerbouti and Sheikh Yermahni have been gathering their forces and the Legion garrison at Fort Zuassantneuf is now under attack. Supplies and ammunition is running low. Their only hope is the arrival of a supply column...

I made Lenin roll for his officers' Reps which produced some interesting results.

With the fort under attack and supplies running low Captain Clouseau was keen to ensure the supply column reached the fort. So he took a patrol out to meet it, leaving Sergeant Frakov in command of the fort.

No sooner had Clouseau left the fort than some hidden Tuareg cavalry charged from behind the oasis; but some quick thinking from the Captain and the iron discipline of the Legion saw them fight off the Tuaregs who were forced to flee having taken significant casualties.


Meanwhile the supply column under the inept Lieutenant Le Pice and the charismatic Sergeant "Beau" Nydell had a brief false alarm when they thought they had spotted a possible enemy force but it turned out to be a mirage. Their relief was short lived as they had only advanced a short way when they spotted some of the enemy for real and came under rifle fire.

The Lieutenant decided to hunker down and shoot it out with the Tuaregs. Meanwhile Captain Clouseau and his patrol were slogging their way through the desert to the sound of the rifle fire. On their way the patrol spotted the main Tuareg force under Sheikh Yerbouti on their way to seize the supplies.


Unfortunately the greater speed of the Tuareg camelry meant they reached the column first and after a desperate struggle the column were all killed or captured.


On his way Clouseau came across the group of enemy riflemen and engaged them. His men were holding their own until Sheikh Yerbouti and his men - fresh from seizing the supplies arrived. After initially seeing them off the Legion began to withdraw to the fort. But the Sheikh rallied his men and ran the Legion patrol down.

After yet another desperate last stand the patrol were killed and Captain Clouseau left to the tender mercies of the Tuareg.

Saturday, 27 November 2010

Wargames Weekend: Blunte's Battery

After having to reschedule our last weekend, Lenin once again popped over for a few games. We started with a 28mm Napoleonic game set in the Peninsular campaign using the Too Fat Lardies' Sharp Practice rules and Front Rank figures. The British brief was as follows:

Background
The French army has taken up positions on a ridge directly in the path of the British advance. Ahead of your position they have occupied the village of Villar Formoso and set up an artillery battery on the edge of the village. If it is brought into action this battery will command the entire flank of the British assault on the ridge.

Objective
Your orders are to take part of the light company of the North Essex and seize the French battery at dawn in a coup de main thus allowing the main British assault on the ridge to proceed.

Forces
Captain Richard Blunte, Status III
A jolly good chap an average stamp but no looker. He has never done anyone harm and started life as an urchin from the Orphanage. He is a fair hand with a sword but a novice in the saddle. An honourable and lion hearted man he is nevertheless somewhat lecherous and know as a ladies man.

Lieutenant Harry Pryce-Waterhouse, Status II
Sergeants Smith and Jones, both Status I
Forty men of the light company who are good troops

Sergeant O'Leary, Status II
Ten riflemen who are good troops and include two Chosen Men

The Game
The British assaulted the ridge at dawn but the French sentries managed to spot the riflemen as they started to cross the river at the base of the ridge. fortunately the redcoats fared better and managed to get somewhat closer to the French position before being spotted.


The French took some time to respond to the alarm and Blunte seized the initiative taking on one French group whilst they were still in their billet. The French artillery crews initially rushed out of their billet but quickly had second thoughts as their comrades came under volley fire.

An assault on the the building with the first French group caused several casualties and forced them to withdraw pursued by the British.


The remaining British troops under Lieutenant Pryce-Waterhouse discovered the French Captain Camembert ensconced in the church and immediately attacked. After an initial firefight the British assaulted the French position and eventually pushed the French out of the church; however, after a couple of counterattacks the French recaptured it but suffered heavy casualties in the process.

In the meantime the French artillery crews had regained their nerve and tried to reach their guns but came under heavy fire and were forced to withdraw.

Captain Camembert decided it was time to drive the British from the ridge. He regrouped his men and made a last ditch charge. The attack started well but under the coordinated fire from the various British groups it faltered and the day went to Blunte and his men.

Saturday, 13 November 2010

Why I Don't Like Rules with Saving Throws

What the hell is he on about? - you may ask, but I just don't like rules with saving throws. My main gripe is that they usually don't tell you why they included a saving throw mechanism in the rule mechanics. Now I can come up with post event rationalisations for most things, and there are reasons why saving throws might be appropriate, but I often think they've just been included due to the limitations of using the d6.

So you can probably justif saving throws where they represent armour or cover, you could also include them as a way of representing defending in a melee combat but including them in 18th or 19th Century rules as part of a fire combat mechanism just mystifies me. I suppose you could argue it does give the inactive player something to do but the net result is pretty damned frustrating for the active player and that's not a good result (paeticularly when the inactive player doesn't know why he's actually rolling any dice!)

However, being a deeply flawed and cynical individual I think it's probably more to do with the fact that the people writing the rules are used to the saving throw mechanic as opposed to there being any actual logic behind it. Or if it was really thought about it was just to address the way probability works when modifying d6 results - if that's the reason then use a die with more sides would be a better option IMHO!

Anyway, there it is and so now you know why (a) none of the rules I write has a saving throw mechanic (although if I did ever use one I would tell people what it was intended to represent!) and (b) why none of my favourite rules has it either. Alternatively I could just be too damn picky or just p,ain old bonkers - I'll leave you to figure that out...

- Posted using BlogPress from my iPad

Saturday, 11 September 2010

Wargames Weekend: West Germany 1979

Our last tabletop game was a playtest of the Cold War Commander rules using Lenin's new 1/600 Oddzial Osmy kit.

I took the US forces facing Lenin's Soviet onslaught.


Fortunately for me the Soviet advance didn't start too well with their right flank immediately rolling a Command Blunder and began to withdraw. On the following turn they rolled another Blunder and opened fire on their own command.


Unfortunately these problems for the Russians didn't last long and their advance soon began to gain momentum. As soon as they came into view of my tanks on my right they opened fire and we began to properly test the rules.


With their superior numbers and artillery support the Soviet forces, whilst taking some significant losses especially for the infantry, overwhelmed my US troops and the game ended with what was left of my forces reaching their breakpoint and withdrawing.

The rules were not all that clearly laid out or comprehensive as some obvious issues which came up in our game were difficult to resolve. The mechanics were a little too clunky for my taste (I've never been much of a fan of saving throws) but they produced a reasonable game. My overall impression of the rules were that were OK but didn't contain any particularly special ideas or mechanics and so whilst we may well use them again (probably in their 2nd edition Blitzkreig guise) I doubt they will make it into our preferred category.

- Posted using BlogPress from my iPad

Monday, 6 September 2010

Wargames Weekend: Jariban

Our second Two Hour Wargames outing was a 28mm modern game using an adaptation of FNG to cover a GIGN operation in Somalia. Lenin had designed the game to enable us to both to play the French against the system.

Initially we landed by helicopter in some rough ground near the habitation where the Somali pirates had been located. Unfortunately the pirates spotted the landing and we soon came under fire - fortunately not too accurate as it included an RPG7!


My group put down some covering fire to keep their heads down and to allow one fire team to advance on their position. Meanwhile Lenin's group advanced to search the first building on his side of the road.


I managed to deal with the two Somalis I had initially encountered but didn't discover anything else in my building, most particularly no sign of the ransom we had come looking to recover.

As we began to advance building by building we discovered more of the pirates and some gave us some trouble, not least those with the RPGs.


Unfortunately, we lost a couple of men whilst clearing the buildings but we either killed or captured all the pirates and recovered a small part of the ransom.

Wargames Weekend: Arctic Assault

Having spent the first day of gaming using the Lardies' rules we decided to have the second as a Two Hour Wargames' day. The first game was a 28mm WW2 scenario designed to allow me to field a few toys which had not seen the table before including my Bolt Action Soviets (which are all Lenin's work BTW).

As part of the Petsumo Offensive the Soviets were an advance force which had been pushed through the German defensive lines under cover of the poor weather to assault and, if possible, capture the Luostari/Pechenga Airfield to hamper German air operations in the area.


The Soviets initially began with a Leitenant and two squads of Razvedchiki (Rep 4 Scouts) with the possibility to being joined by parts of the main attack force. The Germans had an Obergefreiter commanding a single squad and the flank crew in defence.

The initial fog lifted but it continued to snow reducing visibility (to 16") and hampering movement (-25%). With the conditions and the Razvedchiki's camouflage and training (stealthy) they were hard to spot initially; however when one of their snipers moved forward to engage the German gate guards he was spotted! The Germans tried to open fire with their MG42 but found the mechanism had frozen and were forced to take cover. The Soviets took advantage of the gate guards' predicament and rushed forward to the perimeter fence.


With the alarm having been raised the German forces let into action; however the troops in the buildings near to the gate had something of a shock when they came under fire when leaving their barracks!


Fortunately the flak crew were not within sight of the Soviets and reached their position unscathed. After a couple of near misses one small group of German troops reached the gate position but under fire and having to leap for cover. A Soviet grenade quickly followed but fortunately casualties were light for the Germans.

The other German group, who had been trapped in their barrack block by the advancing Soviets used a rear window to escape, disappear into the falling snow and take up a covering position behind some trucks near the ammunition store and fuel dump.

Meanwhile a Soviet sniper trying to get a bead in the Flakvierling was spotted and regretted it! The German unit at the gate decided to return the favour to the Soviets and tried dropping a grenade over the sandbags onto them. Unfortunately he fumbled the grenade and it landed back in amongst them! One of the Germans managed to leap out over the sandbags but the others were caught in the blast.

More Soviets had now joined the attack but reluctant to move forward on the left flank in the face of the flak unit they used the masking of the falling snow to move to the right flank where a hole had now been cut in the perimeter wire.

With the Soviets through the fence there was a last desperate fire fight between them and the German unit by the trucks. The Germans gave a good account of themselves but were overwhelmed by the Soviet numbers.

With clear access to the ammunition and fuel and with no reinforcements appearing for the Germans (so much for 7 being the most common number rolled on 2d6!) the Soviets achieved their objective.

Wargames Weekend: Firebase

Our next game was our first chance to try out the published version of Charlie Don't Surf! The new Vietnam rules by the Too Fat Lardies. We had tried a playtest version of CDS some time ago and it was interesting to see how they had changed.

I took the role of the Free World player whose objective was to clear the area of hostile forces to allow the construction of a new firebase. I was given an infantry company and a mechanised platoon in M113s for the task.


The VC began the game on blinds in the jungle - something which made the APCs rather redundant as the jungle was impassable to vehicles! Despite several attempts I entirely failed to spot the first two blinds and allowed one of them to ambush me, which resulted in one squad being eliminated and a second withdrawing after suffering heavy casualties.

I continued to press forward and managed to engage one of the enemy units in the front and flank but my flank was exposed in a clearing which didn't do much for that squad!


I managed to get some co-ordinated fire in from two platoons plus one squad of the one who got the pasting earlier and it began to take its toll on the VC (not least due to their lack of Big Men). Eventually the VC decided they managed as much of their objective as possible and fell back.

In the end the game was a draw militarily but a political victory for the VC.

Sunday, 5 September 2010

Wargames Weekend: Furia Francese

Our latest weekend of wargaming was a little later than intended but once again Lenin was kind enough to pop over and gaming commenced.

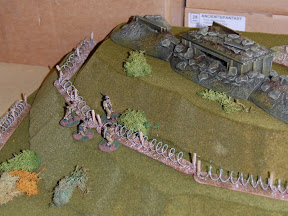
The first game was Great War and so gave a chance for me to use my new trench along with my Brigade and Scarab late WW1 figures. Lenin took the Germans and the trench with me on the attack with Les Poilus. Through the Mud & the Blood are our rules of choice for this scale and period.

The game started with a French artillery barrage, first on the German wire and then moving onto their trench line. Meanwhile the French advanced up the table, trying to make best use of the cover available from earlier shelling.


Initially the I had difficulty spotting the Germans, probably not surprising after the barrage but they soon recovered and we came under fire. Unfortunately for Lenin the Germans didn't have the benefit of a heavy machine gun and, whilst their Maxims gave the French a few problems, they were still able to advance.

Having specially picked up some VB grenade launchers from Scarab (Brigade only release their's after I had bought the Scarab ones) I was somewhat less than impressed by their performance. With a decent range and treating cover at one level lower than normal, if they hit, they do have some advantages; however, losing half the dice for acquiring a target and only having three in the section hampered their effectiveness. The Chauchats proved a little more reliable than usual, actually laying down some fire rather than simply jamming each time they were fired.

The French slowly advanced across the table, mainly due to the card turns rather than any special ability on my part. The Germans, who had sensibly taken cover in their dugout, eventually plucked up the courage to move up to the fighting step.


However, a squad advancing up the communication trench had to cope with one of their original units deciding they had had enough of shelling and French fire and were attempting a withdrawal. The resultant confusion gave the French a chance to move up with only limited return fire.

The French platoon sergeant was hit which slowed the advance on the left flank but the Lieutenant kept things going in the centre with the Grenadier section.


Eventually the French reached the wire, which hadn't been cut by the barrage but was crossable. Fortunately the Germans had taken a bit of a pasting and weren't able to take advantage of the French being hung on the wire. The Lieutenant and his men made the German trench and despite a heroic counter attack by the German Feldwebel and a couple of men the French held on.

With more French crossing the wire the Germans decided to withdraw and make ready for a more serious counter attack - which will have to wait until another weekend (not least because I need to build the rest of the trench network!