Saturday, 24 March 2012

Maurice

The latest set of rules in the Honour series from Sam Mustafa (author of Lasalle and Might & Reason) is now available for pre-order.

Maurice is intended to cover the period from the Wars of Louis XIV up to the French Revolution.  It has a campaign system and the rules themselves are card driven.

More details are available on the Introductory Flyer and a "lite" version of the rules is also available for download along with some sample pages from the rules from the site.

Northstar are handling the UK sales and have the rules and cards available for pre-order (£25 and £10 respectively or £30 together).  The pdf version can be ordered direct from Sam Mustafa.

Great and Glorious Days

Having read and enjoyed both the books by James Faulkner in the Battleground Marlborough series (Blenheim 1704 and Ramillies 1706), I decided to move Great and Glorious Days: Marlborough's Battles 1704-09 by the same author up my reading list.

This book is written in the same very readable style as the other two books and covers the Marlborough's major campaigns of the War of the Spanish Succession. As you would expect it includes the storming of the Schellenberg and the battles of Blenheim, Ramillies, Oudenarde and Malplaquet.

Having read the other two books the earlier sections cover the same ground and whilst not identical are unsurprisingly very similar.   The other campaigns and battles are covered to a equivalent level and suffer (from a wargamer's perspective) from not having a little more detail on the units and orders of battle.

This is certainly a good introduction to Marlborough and is very accessible.  I enjoyed it but am now looking for something with that greater level of detail.

Pike & Shotte Rules

Warlord Games have announced that the new addition to the Black Powder rules family - Pike & Shotte - are now available for pre-order.

I had thought that these rules were intended to cover the Thirty Years War and the English Civil War but according to Warlord's announcement they have been expanded to include the Italian Wars, the Tudor Wars in the British Isles and the War of the Grand Alliance.

I am in two minds about ordering them as I know they will be nicely produced with some lovely eye candy and I do have both Tudor Wars and Montrose figures that I could use with them; however, I am still not entirely sold on the Black Powder system.

In any event, if you are interested Amazon have them available for pre-order at a significant discount - £19.50 as opposed to the £30 RRP.  Although you won't get the free miniature that Warlord are offering.

If you're interested I've popped an Amazon affiliate link below:

Saturday, 17 March 2012

SAGA: Northern Fury

Gripping Beast have announced the first supplement for Saga, their Dark Ages rules.

The supplement includes four new factions: Anglo-Saxons, Bretons, Jomsvikings and Scots, all with new battleboards.  The first three utilise the existing Anglo-Dane, Norman and Viking dice but the Scots have their own new dice set.

A new multi-player scenario is also included.

The supplement is 22 pages long, £12 and Gripping Beast are taking pre-orders for the book, the Scots dice and some appropriate figure packs on their website.

Sunday, 11 March 2012

Ramillies 1706 - Year of Miracles

Having read and enjoyed James Falkner's book on Blenheim, I decided to pick up the companion volume on Marlborough's next major victory - the Battle of Ramillies.

As you might expect this book is written is the same style as the Blenheim one and so is quite accessible.  It is only a fraction longer than the other volume, coming in at 144 pages.  Unfortunately it lacks an Order of Battle but otherwise I found it an excellent primer on the battle.

The book starts with some biographical notes which is pretty handy if you aren't familiar with the main characters of the period, especially as some have proper names along with their titles.

In a way Ramillies was a greater victory for Marlborough than Blenheim despite the fame of the latter, as it was won without the help of Prince Eugene of Savoy and against a French force of almost equal size in a good defensive position.

I have now moved on to Falkner's larger and broader volume - Great and Glorious Days - which covers some of the same ground as the Battleground volumes but much more besides.

Project Update

Having pretty much completed the first phase of Mahdist War project and with my Indian Mutiny project nearing a similar state I thought I would take a look at how things are shaping up. My major project for this year will be my 15mm Marlburians with a couple of other minor ones on the side (budget permitting); however, Lenin decided to get his DPM paints out and so a couple of "modern" projects have jumped the queue. I say "modern" but given both of these are really 1980's I wonder whether we need an alternative term given we're talking about 30 years ago! As someone pointed out to me a couple of weeks ago, if they filmed Back to the Future now Marty McFly would be going back to 1982 (now that's scary - it only seems like last week to me...). Anyway, onto the update:

28mm Falklands War

With this year being the 30th anniversary of the Falklands War, I thought it would be appropriate to expand my collection to include it - with a view to being able to use some of the British troops for other things (see below).

Initially I wondered about doing this at 15mm (and that still has its advantages); however, I had a chance to get some 28mm Royal Marines from a friend of mine so that rather decided things.  The figures are from the Gripping Beast Mo-Fo moderns range, so I have acquired a few more figures from the same range to bulk out the Marines and add some opposition.  This will give me around a weak platoon for each side which should be plenty for my table.

As to rules, there is a scenario covering the encounter at Top Malo house in the Force on Force book so that's clearly a possibility; however, I may drop down to using Chain Reaction/Nuts!

28mm Cold War Gone Hot

I had been interested in doing something in this genre for quite a while before the Force on Force supplement came out.

Indeed we have already played a couple of games based on this previously (for the latest see here) using some of my existing figures and Lenin's Soviet paras.

The germ of the idea came when I started collecting the rather lovely Mongrel modern British (originally for Northern Ireland - see here for photos) followed by some of their Soviets for Afghanistan.  World War 3 was a chance to get these figures to the table a little more often.  As I didn't have enough British Infantry nor were a number of the Afghanistan invasion Soviets suitable for Europe I decided to pick up a few more figures.  I have the Soviets on the workbench being based up at the moment.

As to rules, once again this is a toss up between Force on Force and Chain Reaction/Nuts!

Lenin is hoping to have some more figures ready for Salute so I should be able to get some photos up around then.

With these side projects queue jumping I suspect I will have to limit what else I am able to start this year but I do have a couple of part finished projects that I can progress without too much more "investment".

Sunday, 4 March 2012

First Look: 1812 - The Invasion of Canada

In my search for a light, family friendly entry board wargame, recently picked up a copy of 1812: The Invasion of Canada from Academy Games.  Perhaps somewhat unsurprisingly the game is based around the US invasion of Canada in 1812.

This is a relatively recent release and having read some early reviews it looked like a good candidate to introduce certain wargame-phobic members of the family to a game themed around a historic conflict (I have had mixed success in this area previously with Shogun (the Queen Games version), Friedrich and Wars of the Roses).

1812 is an area control game which can be played with between 2 and 5 players.  It is essentially a team game with the US regulars and US militia facing up against the British regulars, Canadian militia and Native Americans.  The units are represented by wooden cubes and each faction has their own deck of movement and special cards which drive the game.

The board is a map of the US/Canadian border, the former in blue and the latter red, with each broken into the various regions.  The objective of the game is to capture the key areas on the opponent's side of the board.
Turn order is randomly determined by drawing from a bag.  Movement is governed by the cards and combat through special dice for each faction.  The faces of the dice are printed with either a target (a hit), a running man (meaning the unit flees) or a blank (a command decision - allowing withdrawal to a friendly region).  The faction dice differ to reflect the nature of the forces, for example the British regular dice have no running men.

During a turn a player musters new troops, recovers troops which have fled from previous combats, plays a movement card and, if they wish up to two special cards, fights any ensuing combats and then refills their hand.  The movement cards show how many units can be moved and how far either by land or by water (across the lakes).  The special cards provide various advantages, based on history and differ from faction to faction.

As you can see the basic mechanisms are very straightforward.  The challenge is in the decisions which have to be made which are different for each side.  The British muster their regular units at Montreal on the East side of the board but have a number of key regions in the centre whilst the US have their muster locations more evenly distributed but have farther to go to reach the border.

The game comes with three scenarios, the short introductory one and full 1812 and 1813 campaigns.  I have only played the introductory scenario so far but I am really keen to try the full blown campaigns.

Tuesday, 28 February 2012

Dark Age Playtest

I have been looking for a good set of Dark Ages rules for some time.  Whilst I like Saga it is really a two player game and so doesn't provide a complete answer.  So when I had the opportunity to playtest Dux Britanniarum, the Dark Ages rules under development by the Too Fat Lardies I jumped at the chance.

The core rules are actually pretty well developed but are intended to work within a campaign system which is still being worked on.  They are intended to cover the period following the departure of the Romans from Britain and the arrival of the Saxons.

I set up a game with the suggested Romano-British and Saxon warbands and here's what happened.

The locals had spotted the Saxons approaching and had decided to meet them in the open ground before their settlement.  The Saxons gained the upper hand straight away and decided consult the omens which showed they were blessed.  The British leader decided to inspire his men and made a rousing speech.


Then the Saxon champion stepped forward and the British champion took up the challenge.  Initially things seemed to be going the Briton's way but then a combination of blows from the Saxon hammered into him and a final thrust sent him to the next world.  The Saxon warband was elated and began to advance.
Seeing the approaching threat the British warriors formed a shield-wall supported by the levy.
On the other flank the Saxons took the higher ground and formed their own, smaller shield wall.  The Britons advanced under some missile fire.
The Saxons also encountered some slings and arrows but swept the British slingers and bowmen aside and threw themselves at the British shield wall.
With each side's leaders urging their men on the melee was brutal but the Saxons were thrown back.

On the other flank the British swept aside the Saxon missile troops and charged the small shield wall, killing several men and driving it from the higher ground.  Meanwhile, the main Saxon force, realising they had to act of have their flank exposed charged the British shield wall once again and were repulsed once again.  With the Saxons outflanked they withdrew from the field.

Monday, 27 February 2012

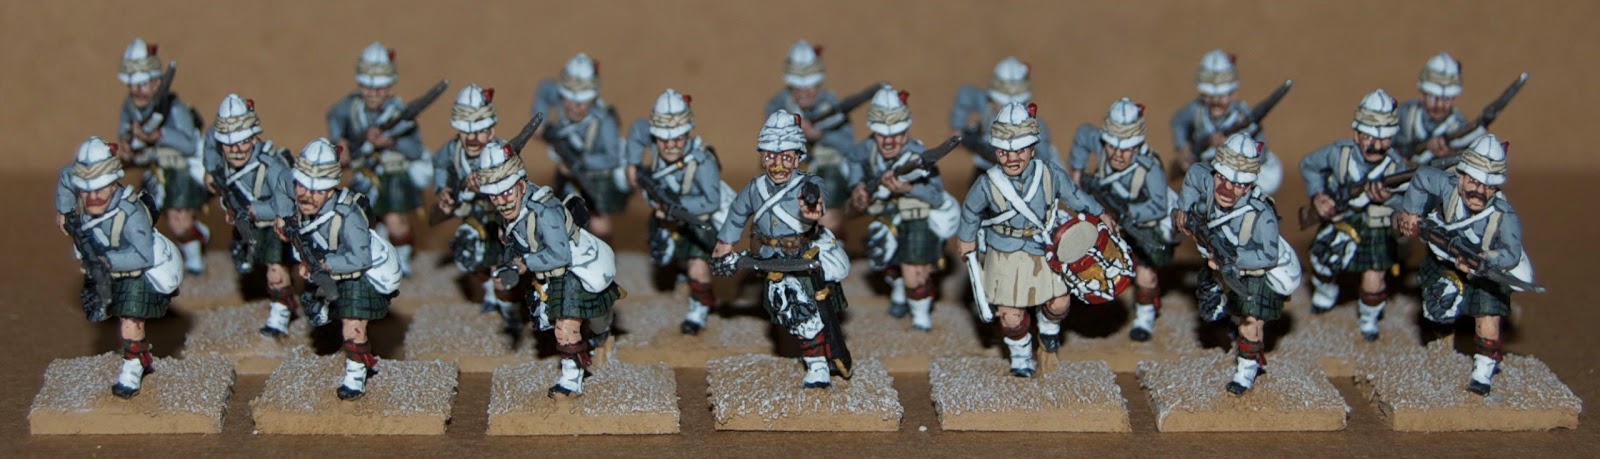
Mahdist War: The Black Watch

And last, but by no means least, of the units for the first phase of my Sudan project, some of the 1st Battalion, the Black Watch:

Once again these are from the excellent Perry Miniatures Sudan range.

Friday, 24 February 2012

Thursday, 23 February 2012

Blenheim 1704 - Marlborough's Greatest Victory

Continuing my background reading for my Marlburian project, I could hardly pass up the chance to read about his most famous victory.

James Falkner's book Blenheim 1704: Marlborough's Greatest Victory is part of the Battleground series and not only provides a good description of the battle itself but information should you wish to walk the battlefield.

The book is 142 pages and provides a brief background to the War of Spanish Succession and the battle itself.  I found Falkner's style very readable and polished the book off rather quickly.  From a wargamer's point of view it does provide a good introduction and covers the main elements of the battle but may be a little light on detail for some and lacks full orders of battle.  That said, few of us have anything like enough troops to put on the whole battle in any event!

I am looking forward to reading Ramillies 1706 in the same series by the same author.

Tuesday, 21 February 2012

The Last Argument of Kings

I spotted a copy of this Black Powder supplement recently.  It covers the 18th Century and, whilst Black Powder isn't my favourite ruleset, I was sure it would make interesting reading and might help inspire me to progress my 15mm Marlburians.

This is a softback book but is still very nicely presented in an otherwise similar style to the main rulebook.  At 112 pages all in it has main sections on the War of the Spanish Succession, the Great Northern War, the War of the Austrian Succession, the Jacobite rebellions, the Seven Years War, the wars in the colonies and some raids and invasions.  Each major section has some background, an outline of the armies and personalities involved (with associated army lists and special rules) and a battle scenario.  The scenarios cover Blenheim, Holowczyn, Petrovaradin, Fontenoy, Hundorf and Ackia along with a campaign for the 1745 Rebellion.

As with the main rules the text is interspersed with some lovely eye candy and the occasional interesting nuggets in sidebars.

I found it a very interesting read but obviously your mileage may vary and the rather handsome price tag (£18) is certainly going to put many off though.

Sunday, 19 February 2012

Mahdist War: Naval Brigade

And now some of the Naval Brigade:

Once again these are 28mm Perry Miniatures.

Mahdist War: Yorks & Lancs

Here are some more additions to my Sudan collection, firstly the 1st Battalion, the York and Lancaster Regiment:

These are all 28mm Perry Miniatures.

Thursday, 9 February 2012

Wargames Weekend: Coulogne

Our final game of the weekend was a chance to try out the latest edition of I Ain't Been Shot Mum by the Too Fat Lardies.  I decided to select a scenario from the Defence of Calais supplement (suitably adjusted for 3rd edition and for my available forces).  Lenin took command of the defending British and I took the Germans.

The British troops, from the 1st and 2nd Searchlight Regiment under the command of Col. R.M. Goldney, were positioned in and around the small town of Coulogne and the nearby village of le Colombier.
They were facing elements of Assault Group Kruger of the 1st Panzer Division and only had a single actual anti-tank gun and a few Boys rifles.

Having decided not to advance along the south bank of the canal, largely to avoid the bottleneck at the single bridge, the Germans began on a narrow front between the canal and the Les Attaques/Calais road.  This several limited the advantage of their numbers.

The attack began slowly (largely due to checking that things hadn't changed from previous editions of the rules and because I hadn't thought through a proper plan).  The anti-tank gun targeted the first Panzer III but failed to penetrate, which was unfortunate as it then came under heavy fire and was silenced.  However, the two Boys anti-tank rifles faired somewhat better.  They weren't able to brew up the tanks but managed to keep chipping away at them which hampered the German advance.

The Germans chose to try to outflank the British position in the village but some stalwart defensive fire from the village caused several casualties and one flanking force then came under fire from another British group on the hill ahead.  A long slugging match ensued with the Germans being held up for far too long until they eventually whittled the defenders down and broke through.
It was then a race up the main road towards Calais to see if the Germans could exit the table before the time limit.

The German column advanced quickly up the road with one of the remaining undamaged Panzer IIIs in the lead but then the other parts of the Searchlight Regiment revealed themselves, both in front (blocking the route to the objective) and to the flank.
The combined fire not only took its toll but it forced the German advance to grind to a halt and gave victory to the British as their delaying tactics had been successful.

Wednesday, 8 February 2012

Wargames Weekend: The Mad Baron & the Living Buddha

For our first game using the extended table we chose a scenario from the Too Fat Lardies' 2010 Summer Special which used their Through the Mud & the Blood rules for the Back of Beyond.  This was a chance for Lenin to get some of his extensive collection of Copplestone Castings figures out again.

Somewhere in Mongolia, January 1921, Baron Stengern von Underberg (do see what they did there?) leads an attack on Kahke Bator to free Chaka Khan, the Tibetan Lama of dance from the clutches of the Chinese warlord, Wang Chung.

With a mixed force of Mongolians, White Russians, Chinese and German mercenaries along with his occasional bouts of madness the Baron had his work cut out.  Wang Chung had just taken delivery of some machine guns to reinforce his Chinese troops.
The Baron split his force, sending his second in command, Major Smirnoff, with the best troops to pin down the town's defenders whilst he moved attack from the North with his Mongol cavalry and his somewhat less reliable troops.

Things began well with Smirnoff engaging one of the machine guns and gradually whittling them down whilst the Baron conducted his flanking manoeuver.

With the first machine gun taken care of Smirnoff moved towards the second but Wang Chung had sent a unit to reinforce the machine gun's position (too late as it turned out) which then began to engage the Baron.  The Baron's troops soon put paid to the Chinese reinforcements and the Baron sent his own Chinese troops to occupy the building.  Meanwhile he thought he had spotted a damned Bolshevik amongst the Russian unit and promptly dealt with him.  Shortly afterward he spotted a good omen and ordered an advance on another occupied building.
Unfortunately the building was occupied by heavily armed Dare to Die troops and bloody hand to hand fighting ensued.  The Russians were thrown back but not before inflicting some heavy casualties on Wang Chung's men.

The Baron then sent his Mongol cavalry to sweep through the centre of the town to engage the remainder of Wang Chung's troops.  This was a little unwise and the cavalry swept majestically into some withering cross fire.
With Smirnoff not moving quickly enough for the Baron's liking he rode around the town to them and took command personally - sending the Major to command the Chinese troops.  The Baron then eliminated the machine gun and began an assault on Wang Chung's headquarters.

The firefight took its toll on both sides but the Baron eventually prevailed and took the HQ but not before Wang Chung had made good his escape with Chaka Khan - if only the Mongol cavalry had been around to cut them off...

Tuesday, 7 February 2012

Wargames Weekend: Fittleworth's First Foray

Near Suakin, Sudan 1885
The fuzzies have been getting rather too bold of late and it was decided to give Osman Digna a damn good thrashing (six of the best, trousers down) to put him back into his place. So a column left Suakin with the aim of bringing him to task.

The main column is making camp when some fuzzies are spotted and it is decided to send a patrol in force to run them off. Captain "Boko" Fittleworth (Lenin) is given command. Most of the units from the column were able to spare a platoon so the patrol is made up of around two companies of mixed troops. Boko's old chum Captain "Stilton" Cheesewright (me) was sent along to be second in command. The patrol's objective was to clear the area to the west of the column, engaging and driving off any enemy forces they might encounter.
Boko decided to split the patrol into two with Stilton taking the KRRC and Highland detachments up onto the high ground ahead. Taking the cavalry, RMLI and infantry Boko circled around the high ground following an old camel path. Stilton found the going rather tough as the ground was pretty rough on the way to the ridge. This meant he was somewhat delayed. He had a little fright when it looked like the high ground was already occupied by the enemy but fortunately it was just one of the scouts being a little jumpy. Boko also had a false alarm in the scrub ahead but then as they rounded the end of the ridge they spotted a very large body of fuzzy-wuzzies. With the British troops desperately trying to deploy from the column into firing lines, the fuzzies began to advance.
As the RMLI were nearest to the enemy, they took the brunt of the first attack with two units of Beja charging them. With iron discipline the Marines held their fire until the optimum moment and loosed a devastating volley. But it wasn't enough and the Beja crashed into the British line. A fierce melee began and the fuzzies' numbers began to tell.

On the hill Stilton had finally reached the summit and come to the attention of the enemy. A unit of Jehadia infantry, with rifles taken from previous Egyptian expeditions, and some straggling Beja. A few volleys saw off the Beja but the remainder of the patrol was in some trouble.
With the RMLI hard pressed the Hussars were the next to receive a Beja charge. Of course they counter-charged and a terrible hand to hand fighting ensued. Meanwhile the Marines cracked under the pressure and the fuzzy-wuzzies broke through to the next infantry line. Despite successful volleys and some hard fighting the overwhelming Beja numbers began to tell and Boko's part of the patrol was swept away.
Stilton had turned his units to move to help Boko but realised it was too late and began to withdraw. Unable to simply march away from the advancing hordes he organised his troops into a firing line and began falling back in good order. Volley after volley thinned the enemy numbers but sporadic rifle fire and fanatical charges took their toll; however, in the end the Beja tide broke and Stilton was able to withdraw with his few remaining men.

Wargames weekend: SF Mash Up

We started off our second day with a trial of the S&G Skirmish Games system in a strangely familiar science fiction universe. With inspiration coming from various SF series including Farscape, Firefly, Red Dwarf, Terminator and ST:TNG, it's Blakes 7, but not as we know it!

Professor Dyson, the renowned robotics engineer has been off the grid for many years. Both the Federation and the Resistance have been seeking him. Both sides have recently had good intel that android parts have been being shipped through a certain space port and so go to investigate.

Federation Commissioner Sneer sends Space Major Perkins (who lost one eye and an arm to the Resistance) and some Federation troopers. Whilst the Resistance is ably represented by a renegade Federation Officer, Aeyrn Moon, a grey skinned con artist called Chianti and Crouton, an overly obsequious robot butler.
Things begin to go badly for the Resistance almost immediately when Crouton opens a shipping container and releases a Parrot Dog, a barely trainable carnivore from the Sirius system, which some idiot has been illegally transporting. Whilst Crouton and Chianti are trying to deal with the Parrot Dog, Officer Moon starts a firefight with the Federation Troopers. As things develop Chianti gets caught between the Parrot Dog and the Federation troopers and is badly wounded. Meanwhile Crouton slips away and, rather unwisely, opens another shipping container which, unfortunately contains another three Parrot Dogs!
Officer Moon manages to eliminate the first Parrot Dog and escape the Federation Troopers whilst Crouton is running for his metal life away from the other three Parrot Dogs. With Space Major Perkins happy to sit back and let the Resistance deal with the Parrot Dog problem, Moon and Crouton have their work cut out for them.

With the carnivores dispatched, the Space Major and his troopers decided to move in. In danger of being cornered and captured Moon and Crouton transported back up to their ship (but not after having planted a transponder on the Federation ship).

Perkins found sufficient information at the spaceport to lead him to a desert planet. He contacted Commissioner Sneer who joined him there. The Resistance followed at a safe distance, formed a landing party from Officer Moon, Crouton, their perky female engineer Kylie and Pretty Boy Jim, their pilot, and transported down out of sight.
With both parties moving towards the only structure in the area, a ruin, an encounter what inevitable. Almost immediately a firefight broke out with each side using parts of the ruins as cover. The Federation troopers were coming off worse this time but Crouton was up to his old tricks and looking around. Suddenly he stumbled upon a metal object in the sand. On closer inspection it turned out to be a heavily armed and rather hostile android!
With things starting to look sticky, Commission Sneer decided to withdraw (planning to give the Resistance a taste of their own tracker medicine), leaving the others to deal with the robotic guard. Crouton once again managed to slip away and it was left to Jim to have showdown with the android - one which he one! The Resistance then located more clues to the whereabouts of Professor Dyson.

To be continued...

Monday, 6 February 2012

Wargames Weekend: Tomorrow's War

Our second game of the weekend was a first outing for Osprey and Ambush Alley's Tomorrow's War rules (TW). This gave us both a chance to dust off some Denizen and GZG 25mm SF figures and see how TW differs from Force on Force.
The backstory was that a planet was trying to break away from the Galactic Empire and Imperial troops had been sent to make them change their minds. I took command of the Rebels, who were defending part of one of their space ports with Lenin commanding the Imperial troops. My troops were armed and armoured pretty conventionally whilst Lenin had power armoured troopers with Chameleon camouflage.
The Imperial troops advanced through the light wood towards the perimeter of the landing area and one of their squads spotted a squad of Rebel troops scanning the area from an emplacement. The Imperials immediately opened fire and the Rebels, taken by surprise, were decimated; however, the firing not only alerted another Rebel squad but also gave them a target to aim for. A couple of the Imperials went down to the Rebel heavy weapons and the Imperials ceased fire to avoid giving themselves away. This on and off fire fight continued until the Rebels brought up their reserve squad and concentrated their fire which forced the Imperials to fall back.
On the other flank the second Imperial squad wasn't fairing much better. Their initial attack had less impact and so a similar firefight began with the Rebels eventually getting the upper hand.

With the remaining Imperial troops withdrawing the day went to the Rebels.

Once we got back into the swing of things the rules played out reasonably well. Of course our first issue was working through actions, interruptions and reactions between a set of troops in Chameleon suits with advanced sensors and some hidden opposition!

The key thing we did learn was that we needed more space with 25mm figures (we were only playing on a 6x4' table. Next time we'll be trying it on my new, larger 8x6' table (or if either of us decide to start a new project - doing it in 15mm!)