Thursday, 13 June 2013

4Ground Wooden WC

One of my purchases at Broadside was the 28mm 4Ground Wooden Closet (although given it hasn't any plumbing in evidence I suspect it's not that sophisticated!).  I put it together last night so I thought I'd post a couple of pictures:


As with their General Purpose Wagon it comes on a single sheet of MDF but, in this case, it is pre-finished.  You can assemble it complete or remove some sections to make it look in need of some repair.


It was very easy to assemble and here's the finished article


And here it is occupied by a Brigade Games figure:


Tuesday, 11 June 2013

Broadside Loot

So here's a quick picture of the stuff I brought back from the Broadside show at the weekend:


As you can see I succumbed to more 4Ground stuff along with 7th Voyage from Crooked Dice and some barbed wire bits from Tablescape.  I also picked up a set of custom loads for my 4Ground carts from Colonel Bill's (as suggested by The Angry Lurker - thanks for the tip mate!).

When I'd taken the picture I suddenly realised I hadn't added the pack of 28mm WW1 Belgian civilians/refugees I got from Brigade Models ostensibly to go with some of their WW1 Belgian troops I already have but they're likely to show up elsewhere and elsewhen too!

Broadside 2013

On Sunday I managed to get over to the Milton Hundred Wargames Club show - Broadside 2013 - in Sittingbourne.  I like to get along to support the show, as it's local, but also because it's a great little show.  They manage to attract a decent range of traders (including Warlord Games and Wargames Foundry amongst others) and have a good selection of games.

I arrived about 20 minutes after the show had opened and had a wander around to locate the traders I wanted to throw money at.  Unfortunately one of them had obviously had a change of plan and wasn't there which was a bit of a downer but the others certainly made up for it.  I'll be taking a picture of the loot I did secure separately.

Here are a few photos of some of the games:

An Old West game

AWI (Gravesend Wargames Club)

The Battle of the Boyne (Posties Rejects)

A Sudan game

Denmark 1940 (Deal Wargames Society)

World War 2 game

On Her Majesty's Crooked Service (Crooked Dice)

I also managed to play the Maidstone Wargames Society's Those Magnificent Men in their Floating Machines participation game:


It was a good day to meet up with people too.  Apart from chatting with the Maidstone chaps I had a good old natter with those splendid chaps Ray (Don't throw a 1), Lee (Big Lee's Miniature Adventures) and Fran (The Angry Lurker) at the Rejects' Battle of the Boyne game.  And I was lucky enough to be on hand when Ray was presented with a fantastic gift by Tamsin (Wargaming Girl):


(You'll need to read her post to get the background)  I have no idea how many sittings it must have taken to get such a great likeness (Note to self: Remember to duck the next time I see Ray!).

I also actually got to meet John Lambshead (John's Toy Soldiers) and have a brief chat and John introduced me to John Treadaway (photo courtesy of John):

Copyright 2013 John Lambshead
 And I had a chance to chat with Henry Hyde about his new book and managed to see an early copy - blimey is it a weighty tome!  So all round a good day.

Saturday, 8 June 2013

More Covenanter Foot

Here's the latest addition to my Covenant forces:


As with the Aberdeen Militia the figures are from Redoubt but the flag is from Wargame Designs.

Friday, 7 June 2013

Preparing for another Broadside

Fortunately not in the nautical sense but rather:


I wasn't entirely sure whether I was going to be able to attend Broadside on Sunday as work was looking like it was going to get in the way.  But fortunately deadlines have been moved and so it looks like full steam ahead.

I haven't quite got my shopping list worked out but I have a few things I'm considering getting.  I'm planning to visit Colonel Bills to pick a couple more 4Ground bits and look at some of their custom loads for my cart (thanks for the tip Fran!).  Crooked Dice is next on the list with a possible purchase of their 7th Voyage rules - largely based on the game we played after Salute.  I may look at picking up another KR Multicase to house the early WW2 Polish figures I'm currently basing along with the overspill of other WW2 figures I have dotted around in other places.  Then I may stop off at Products for Wargamers to add to my fences and jungle bits.  And I may well take the chance to pick up some more figures for my Montrose project from Redoubt.  I am also thinking of looking at the Foundry and Warlord stands for figures for other projects too.

All that plus catching up with the usual suspects should keep me busy for the day.  It's a great local show, so if you're going along I'll see you there!

Wednesday, 5 June 2013

Rules for Montrose

With my figures progressing, albeit slowly, I now need to decide which set of rules I'm going to use for my Montrose project.  At the moment I have three candidates, two of which I have played:

The first is For God, King and Country by Bruce McFarlane published by the Canadian Wargamers Group.

As with the other CWG books, this is a guide to the period with a set of rules and scenarios.  The mechanisms seem to be a mash up of the melee rules from Flower of Chivalry (their medieval rules) and the musketry from Habitants & Highlanders (their French Indian rules) with a few specific rules added.

Of course it, like their other rules, does suffer from some rather poor proofreading (as you can see from the cover!)  But as the book contains scenarios for Montrose (Tippermuir and Aberdeen) it's a pretty good place to start as it requires the least work anyway.

Next up is Pike & Shotte by Steve Morgan published by Warlord Games.  I've played these once before - using my Tudor Ireland figures - and quite enjoyed them.  Obviously they're a derivation of Black Powder but with enough changes to make them period specific (or annoying if you're too familiar with BP I suspect).

Unfortunately Pike & Shotte doesn't have any pre-prepared scenarios like For God, King & Country but it does have army lists for Montrose and the Covenanters which is a good start.

The third alternative I have is Bloody Kingdom by Stephen Danes published by AB One Games.  I believe this uses some of the same mecahnisms as his Thirty Years War rules Father Tilly but with some specific Civil War elements added.  Since I haven't yet played either set I can't yet voice an opinion but they look interesting based on a quick read through.

As with Pike & Shotte, Bloody Kingdom doesn't have any pre made scenarios for Montrose; however, it does have sample army lists for Scots Royalists and Covenanters.

I'll be trying each of these out in turn once I have enough figures based and will then report back.  But in the meantime if you've played any of them I'd be interested in your opinion!

For God, King and Country is available from Caliver Books for £17.50 in softback or from Sabers Edge as a PDF for US$9.00.  Pike & Shotte can be sourced from Warlord Games for £30 or you can save yourself some money (as I did) and get it from Amazon for only £19.20.  Bloody Kingdom is available as a PDF from Sabers Edge and Wargame Vault for US$16.00.

Monday, 3 June 2013

4Ground General Purpose Wagon

The next addition to my new Western project is a another kit from 4Ground, this time it's their General Purpose Wagon:


As it's a little smaller than their buildings (duh - obviously!) it comes on a single MDF board but isn't pre-painted like the buildings:


The kit allows you to finish the wagon in one of four simple alternatives - with or without the canopy hoop and with the back open or closed.

Although there are a few small parts, it goes together very easily and I finished putting it together in a jiffy.  Here's the finished result:


I quite like the look of the raw MDF and so I'm not sure whether I'm going to paint it or not.

Sunday, 2 June 2013

The Aberdeen Militia

The next addition to my Covenanter force is the Aberdeen Militia from the Fecht of Aberdeen or the Battle of Justice Mills as you prefer (although I do intend to do another standard eventually to make the unit a little more flexible).


One again the figures are from Redoubt but the flag is from Wargame Designs.

Saturday, 1 June 2013

Battle of Sabine Crossroads 1864

Maj. Gen. Banks
Having, almost literally, stumbled over the box containing my 15mm ACW figures I thought it was high time I got them back on the table.  So I put together a small game for the club based on the Battle of Sabine Crossroads (or Mansfield if you prefer) from April 8th 1864.

I had to make a few slight adjustments to the Union order of battle to deal with the fact I don't actually have any Union cavalry - so the lead cavalry division suddenly became infantry but otherwise I tried to stick to a good representation of the forces using the original Fire and Fury rules.  I had the Union deploy historically but allowed the Rebels a freer hand.

Lt. Gen. Taylor
The Union forces under Major General Nathaniel P. Banks had been advancing up the Red River. They split their joint Army and Navy force and marched towards Mansfield up a single track through the woods. Recognising the enemy’s weakened position, the Confederates under Lieutenant General Richard Taylor had selected the Sabine Crossroads to meet them. Deploying their troops in the woods along the edge of the open ground between the Sabine Crossroads and Pleasant Grove to hide their exact strength and disposition from the enemy the Confederates had to beat the enemy and capture their wagon train to halt their advance.

Brigadier General Albert L. Lee commanding the Union advance division found the Confederates in position overlooking the open ground between the Sabine Crossroads and Pleasant Grove.  He sent a messenger back to General Banks but Bank chose to disbelieve Lee and ordered him to continue his advance.  So our battle commenced with the entire Confederate force deployed at the end of the woods and the two Union brigades from Lee's Division having taken positions in the open ground in front of them.  The Union 4th Division, XIII Corps under Colonel William J. Landram was still in march column advancing up the track towards Pleasant Grove with the remainder of Banks' men someway back amongst the massive wagon train which was blocking the road.


The Confederates saw the substantially outnumbered the lead Union Division and so charged out from the woods towards the Union lines.

Bagby's Cavalry charging Dudley's Union Brigade

Randal's Confederate Brigade assaulting Lucas' Brigade
Mouton's Division advance in the centre
Clearly some of the Union troops were taken by surprise as Dudley's Brigade only managed a desultory fire at the incoming Confederate cavalry and the ensuing melee saw the Union troops thrown back and the Rebels breaking through toward the advancing Union column.  The Union right managed to put more resistance and threw the initial Confederate brigade back.

Fortunately the Confederate cavalry didn't have the legs to hit the Union infantry column which gave them time to deploy.  After their initial rebuff Walker's Texas infantry Division regrouped whilst the Union infantry took the chance to fall back towards Pleasant Grove.

The Rebels regroup for a second attack

Bagby's Brigade charge into Vance's infantry Brigade
Bagby's Rebel horse weren't so lucky this time and Vance's Union infantry fired a decent volley before the cavalry charged home and managed to see them off.  But Lucas' Brigade wasn't so fortunate when Walker's Texans assaulted them a second time.

With Vance's Brigade having checked the Union cavalry it gave time for Emerson's Brigade to form line and cover the retreat of Lucas's rather battered infantry.  Then the fight for Pleasant Grove began.


With Landram's Division hard pressed defending Pleasant Grove, Union reinforcements in the shape of Brigadier General Robert A. Cameron and the 3rd Division of XIII Corp began to advance alongside the wagon train.  But they had a long way to travel up through the woods and the Confederate attack wasn't slowing.


With the sheer weight of numbers telling Landram's Division bravely fought on and, despite having been outflanked by Rebel cavalry they were holding up a large part of the enemy infantry.

The remnants of Dudley's Brigade, who had fled from the first Confederate cavalry charge,  were being pursued by the cavalry and decided to turn and make a fight of it.

A devastating volley checks the cavalry
But with the Union centre shrinking this small act of defiance wasn't going to be enough.


Finally the weight of Confederate fire and numbers took its toll and the grim determination of Vance's Brigade couldn't hold them.  The Union troops fell back but were outflanked by the advancing Rebel cavalry and were caught in an unenviable position.


With the lead Union Divisions crushed and the Rebels pillaging the front of the wagon train it looked like it was all over for the Union.


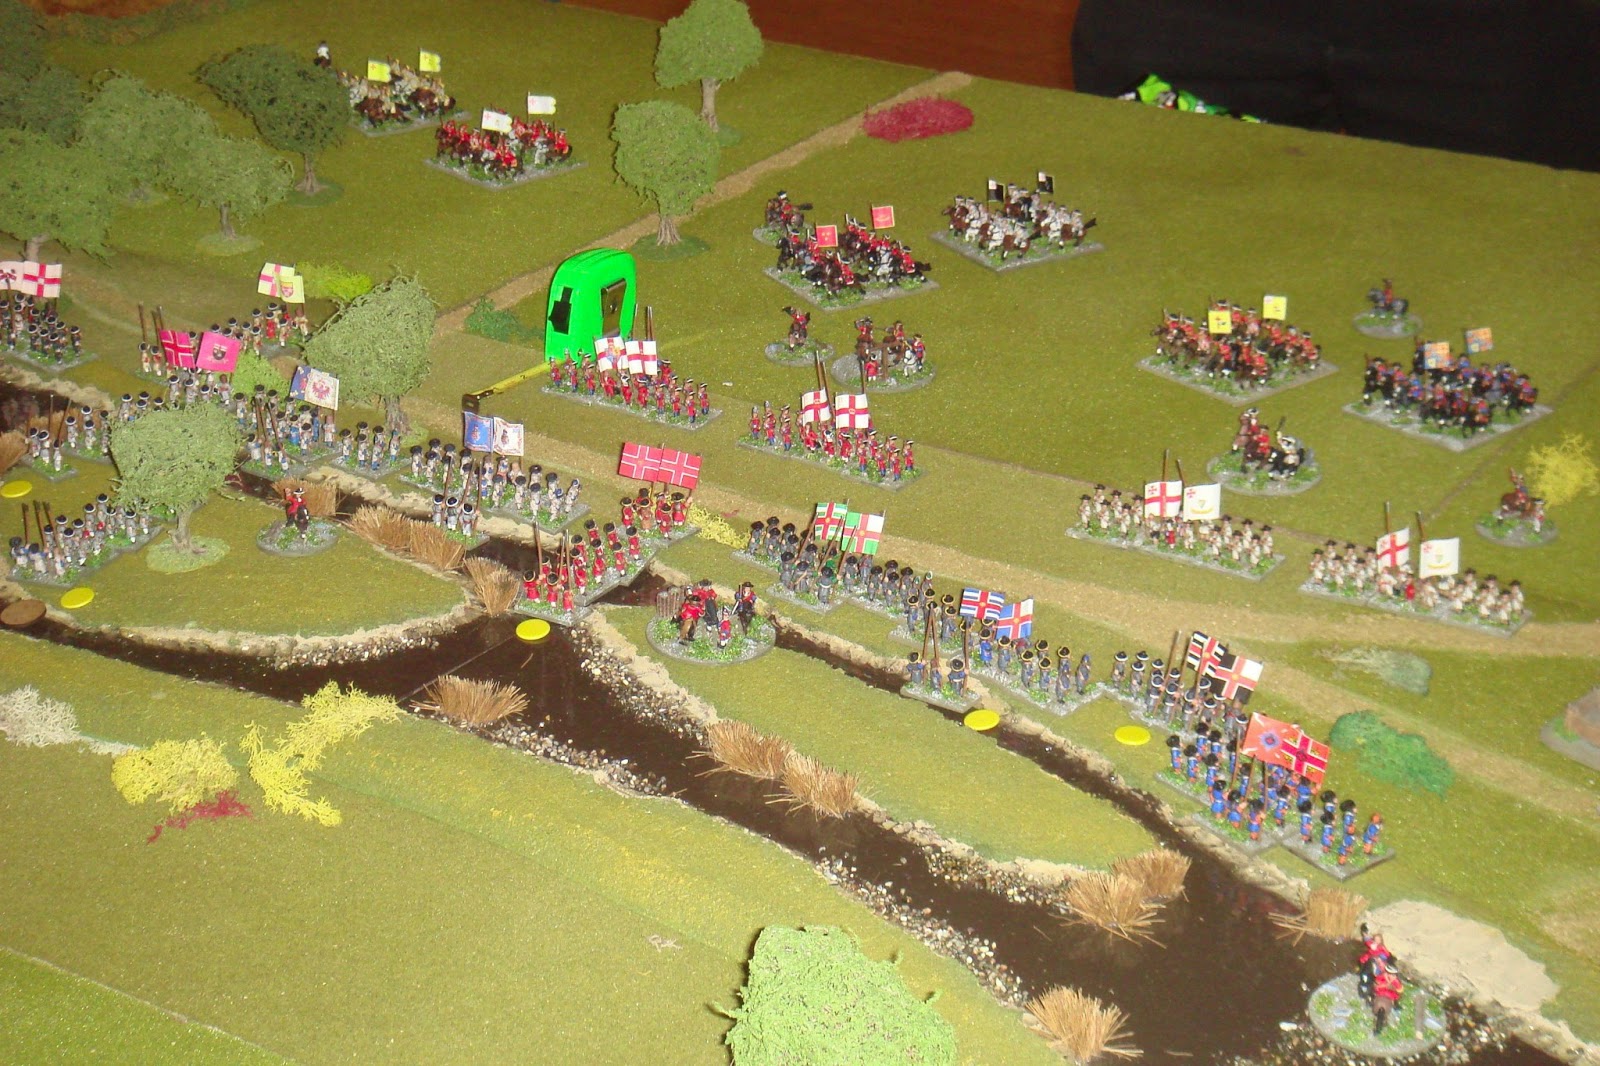
But finally hope was in sight as Brigadier General William H. Emory and the 1st Division of XIII Corp began arriving and forming up behind the stream.

Emory's Division arrive and form up
Seeing the danger the Confederates formed themselves up on the ridge overlooking the Union position and dared the Federals to advance!

The Confederate right

The Confederate left
With battle lines drawn and dusk beginning to fall the Union left advanced towards the Rebel lines.


A fight began on the Union left and the Rebels put up a hell of a fight with charges being made by both sides.  Waul's Confederate Brigade almost single handedly held up the main Union attack.  And with the Confederate cavalry having regrouped and advancing around the flank of the Union their position began to look slightly precarious; however, the light failing allowed the Union troops to withdraw leaving the Confederates to celebrate their victory.