I was fortunate enough to get a few gaming related books this Christmas starting with the Black Powder rules from Warlord.
The rules cover the horse and musket period but have been extended a little to include colonials. The rules are certainly beautifully presented with acres of eye candy. They are based on a core set of mechanics which apply to all the periods with additional special rules for individual periods. The mechanics themselves are fairly traditional but appear to be for those gamers who have large collections of figures and want to get them out and use them without having to learn a completely different set of rules for each period.
The authors have used an entertaining style and have made it clear that they have written the rules for large quantities of 28mm figures on large tables but have provided enough information to enable the rules to be used with smaller scales and tables.
I have played in a couple of games using the rules but I am looking forward to playing one now I actually have the rules themselves!
Next up was a copy of Infantry Attacks written by Erwin Rommel himself.
Originally published in 1937 the book covers his experiences in the first world war (which were extensive) and should provide a real insight to the legendary military leader.
I am really looking forward to reading this one!
And finally I got a copy of The Great Mutiny: India 1857 by Christopher Hibbert which is ideal for my new period.
Now off to do some more basing...
A place to share my thoughts on miniature wargaming, reviews of rules and miniatures, and comments on board and card games, RPGs (and anything else that takes my fancy!)
Tuesday, 28 December 2010
Saturday, 25 December 2010
Happy Christmas
Here's wishing you all a very merry (although you may regret too merry) Christmas and hoping that Santa brought you something fun!
Thank you for taking the time to read my various ramblings and particularly to those of you who were kind enough to provide some useful feedback.
I have been lucky enough to get some useful gaming inspiration so far and, due to our particular approach to the day still have a couple more things to come so fingers crossed for some gaming goodness...
Saturday, 4 December 2010
First Look: The Big Hurt
With Two Hour Wargames offering a discount on their second edition Nuts! Rules I thought I would pick up a copy (we've been using a mix of the original, CR3.0 and our own interpretations). Whilst I was looking I spotted another scenario book - The Big Hurt - and thought it was worth a look.
The Big Hurt (TBH) is a scenario book for Nuts! Second edition by Darby Eckles that covers the Battle of the Hurtgen Forest from September 1944 to February 1945. The secenarios are intended to be played from the US side with the system runnng the German forces and they link together to make a campaign. You are intended to develop a single detailed infantry squad which may be reinforced in any individual scenario and follow the squad through their various encounters.
TBH is 47 pages long and contains 21 scenarios along with some background, a few additional rules and all the necessary stats and tables. There are some sections from the main rules reproduced for ease, for example those on the Non-Player forces mechanics but access to the main ruleset is a necessity.
The scenarios are designed to be played on a 5' x 3' table and each scenario map is appropriately covered by a 6" grid to make layout easy. Each scenario covers approximately 1 page (in the usual THW two column format) and is split into Situation, Objective, Forces, Terrain, Deployment and Special Instructions sections.
The whole thing looks pretty well put together and I am looking foward to playong through it once I have the appropriate toys procured!
Friday, 3 December 2010
Wargames Weekend: Operation Cauldron - Part 2
With the landing a success the Commandos moved on to their main objective. With their approach covered by two MG34s the attack needed some careful co-ordination but they managed it and the MGs were soon silenced but the alarm had been raised.
Swift action by the Commandos saw them storm the wire and take the German MG positions and engage both the other German infantry position to their flank and their approaching reinforcements.
The next rush into the German infantry produced mixed results with the Germans initially fighting back with serious results but eventually being overwhelmed.
The German reinforcements tooks cover behind the hedgerow but then became trapped between two groups of Commandos and were slowly eliminated.
The German flak tower then came under fire and before it could return fire with devastating effect they took enough casualties to ensure the kept their heads down.
With the Commandos moving towards the artillery positions more German renforcements appeared; however, these weren't the garrison troops they had previously been facing but some more experienced troops.
These reinforcements took up a position between the Commandos and their objective and laid down some punishing fire. This meant each side truing to outflank each other. Initially the Germans had some success but a brave rush combined with an effective grenade throw devistated one of their positions and thngs started to come unravelled for them.
The Commandos began to mop up the last resistance and, with the artillery crews running for their lives, finally reachd their objective and disabled the guns with their satchel charges.
Wednesday, 1 December 2010
Wargames Weekend: Operation Cauldron - Part 1
At our last gaming weekend we had discussed the fact that we didn't often play "big" or linked games very much and our attempts at putting together anything approaching a campaign had been a bit of a failure. So to remedy this I decided to put together two linked WW2 games based around the August 1942 Dieppe operation. In this case I went for the attack on Hess Battery to the flank of the main assault - mainly because I wanted to use my Foundry Commandos and a few other bits I have picked up over the year. Obviously we couldn't model the entire Commando raid at 28mm on my 6x4 table so I scaled things down a little.
Objective
Assault the Hess Battery, prevent it from engaging the main landings at Dieppe and successfully withdraw with minimal casualties.
The Plan
Orange Beach is to the right flank of the main assault on Dieppe and comprises two separate landings by 4 Commando. C Troop with a section of A Troop under the Command of Major Mills-Roberts are to land on Orange Beach I near Vasterival and proceed to secure the headland and advance to provide covering fire for the main assault on the battery. B and F Troops with a section of A Troop under the Command of Lt. Col. Lord Lovat are to land at Orange Beach II, between St. Marguerite and Quiberville, disrupt enemy communications and advance up the Saane valley and assault the battery from the flank/rear.
Once the order is received all units are to withdraw to their embarkation points.
Forces
F Troop HQ
Two sections of F Troop
The initial landing was a bit of a mixed affair. The German sentries and MG teams didn't spot the landing craft until they were almost at the beach but once they did the LCAs came under some heavy fire. The land craft crews tried to keep the German's heads down with their lewis guns but this only silenced the rifle fire and the MG34s kept blazing away. The Commandos added their brens to the firefight and things went onto a slightly more even footing.
With the ramps down the Commandos started to rush ashore. This was when the encountered their first casualty. Leading one of the files of men onto thr beach the TSM was caught by a burst of German MG fire and was killed instantly. This slowed the disembarkation from one LCA but the other went a little more smoothly.
With the combined Bren and SMG fire from the Commandos keeping the German MGs quiet the assault on the wire began. Whilst a few of the Men got hung up on the wire enough got through to begin the climb to the heights to attack the MG position there. A quick rush with a grenade put paid to one of the German MG34s.
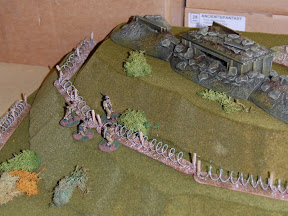
On the other side of the beach things had stalled with the death of the TSM but eventually got going again and with the wire crossed the last German resistance at the beach was dealt with.
With the prisoners secured the advance continued but the remainder of the German section was advancing on the beach from their billet so the Commandos took up covering positions and quickly dealt with them. They then advanced towards the buildings but as they approached they could hear vehicles approaching down the road.
The Commando teams split up to secure the buildings and to deal with the approaching threat. The team on the high ground spotted a German truck and motorcycle team coming down the road. A hail of automatic fire saw the the motorcycle combination crash into a wall and the truck almost do the same. The toss of a grenade from the other team put paid to the German reinforcements whilst the others secured the buildings.
With the beachhead secured the Commandos could move on to their main objective - the battery.
Subscribe to:
Posts (Atom)